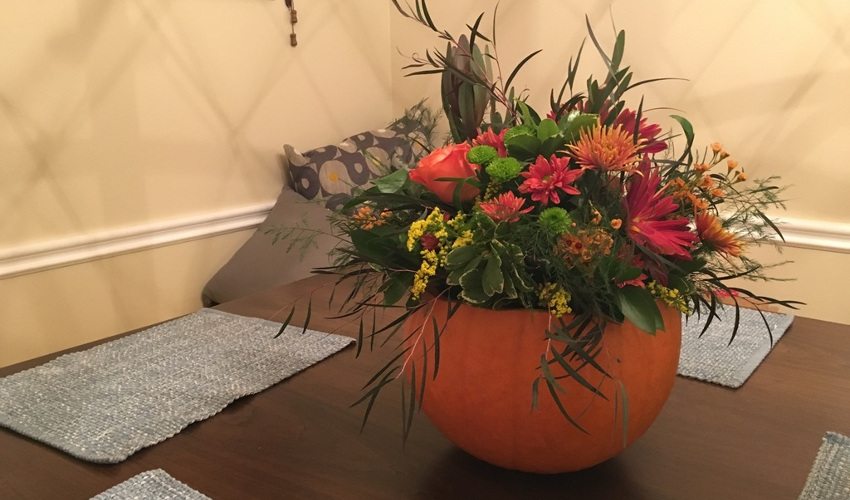
How to Make Pumpkin Planters
Feb 19th 2021

Pumpkins are the ultimate autumn decoration, but you can do so much more than just pile them around or carve jack-o-lanterns. Pumpkin planters are easy to create and there are many ways to use them beautifully for all your fall decorating.
Pick Your Pumpkin
While any pumpkin can be carved as a planter, a round pumpkin with a sturdy, level base will be easiest to use for planting without risks of tipping or looking unbalanced. Very small, narrow or skinny pumpkins may not have enough of a central cavity for effective planting. Whatever shape you choose, the pumpkin should have firm, solid flesh without any splits, cracks or bruises that would make the planter decay more quickly.
After choosing your pumpkin, wash it carefully to remove any excess dirt, dust or other debris from the skin. If desired, you can also paint the pumpkin either a solid color or create a pattern on your pumpkin "pot" before planting it.
Plants for Your Pumpkin Planter
Any plant you would normally put in a container can easily be added to a pumpkin planter. Popular options include fall favorites such as chrysanthemums in rich autumn tones, as well as other seasonal blooms. You can also plant herbs in smaller pumpkins for a windowsill garden, or even use tiny pumpkins as succulent planters. For the largest pumpkins, remember the "thriller, filler, spiller" formula for choosing different plants, and consider draping or weeping plants that will help conceal the lip of the planter so any messy cuts aren't visible.
Carving Your Planter
You will need a very sharp knife to carve your pumpkin planter smoothly with clean, even cuts. Children should be carefully supervised if they will be assisting in this project.
- Cut the top off your pumpkin, making a wider mouth to the pot than you typically would for a jack-o-lantern. The opening should be slightly wider than the root ball of your plant, or wide enough to allow you sufficient space to fit all the plants you want to include.
- Scoop out the pumpkin seeds. The scooping does not need to be perfectly smooth and clean, but you do need to make enough room for your plant's roots. Save the seeds to roast for a tasty treat, or offer them as-is to backyard birds. Don't forget to save a few to plant!
- Use a drill, awl or screwdriver to make 3-5 small holes for drainage in the bottom of the pumpkin. These holes do not need to be big, but should be evenly spaced around the bottom to be sure excess water can run out and roots aren't soaking wet.
- Fill the base of the pumpkin with a scoop or two of dirt or potting soil. This will help position your plants correctly and give the roots space to spread out. If you will be using plastic pots inside the planter, you may not need this step, or could use gravel if preferred.
- Gently insert your plants into the pumpkin, snugging them down into the soil and adding more soil to fill in the sides and top of the planter as needed. If you are keeping your plants inside their plastic nursery pots, they can simply be inserted into the pumpkin shell.
- Complete the finishing touches on your planter. Adding moss or gravel as a top coat can hide messy carved edges, or you might want sprigs of berries, grain or seasonal twigs to burst from the center of the plants. Wipe the planter down gently once more, and you're finished!
Pumpkin planters can be displayed anywhere you'd like, from decorating a front entryway to accenting a deck, patio or gazebo outdoors, or even bringing them inside as centerpieces or mantle accents. Well-crafted pumpkin planters can even make great autumn gifts or could be used as party accents. If using your planter indoors, be sure to protect surfaces from moisture whenever you water the plants.
Proud Pumpkin Planter Displays
Care for pumpkin planters just as you would any containers. Choose their position to give plants adequate sunlight, and protect them from damaging storms or strong winds. Water plants as needed, ensuring that the pumpkin's drainage holes are not blocked. In time, the pumpkin planter will begin to rot and soften, but you can extend its lifetime by keeping in a cool, dry, shaded location as much as possible. After it can't be used anymore, you can compost the pumpkin or put it where wildlife can feast. With all the enjoyment you've gotten from your pumpkin planter, you'll want to have even more pumpkins on hand for more of these beautiful pots next fall!

